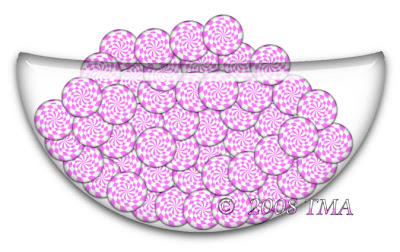
The tutorial below is to make this bowl. For those of you who want it, you can download the bowl and candy HERE. This zip contains an empty bowl and a full bowl, both as png's.

Candy Bowl Tutorial
Download a zip containing a png of the bowl outline I used HERE and open it.
You do need a working knowledge of psp and need a copy Eye Candy 5 Impact for the glass. I'm sure you can probably try other methods to make the glass. For this tutorial I chose EC 5 Impact
Open the Candy Bowl Outline png, using the magic wand select the inside area. Add a new raster layer.
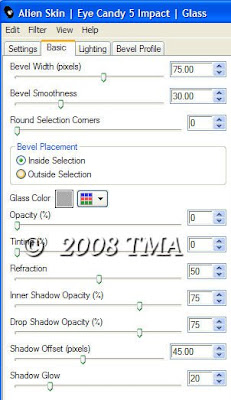
While on the new layer go to, effects>EC Impact>Glass and select Clear Glass from settings menu. Go over to the next tab marked Basic and check the settings to match mine in the image here. You can play around with the settings, if you want. You can even make the bowl a different glass setting. Your choice. If you make it a dark glass, you might have to lower the layer opacity to see the candy thru the bowl.

Go to select none and then delete the layer with the bowl outline and save this bowl as a new image. Save as a png if you want to stop here or save as a pspimage if you want to fill the bowl.
Filling the bowl basically consists of copying a candy to a layer beneath the bowl layer. Resize to make the candy look proportionally right to the size of the bowl. Duplicate this layer and move the candy over to the side some. Keep duplicating layers and moving until you have enough to make the bowl look full and have some coming out of the top. You may have to turn off the bowl layer to grab the candies to move them. Occasionally turn the bowl layer on to make sure your candies are staying inside the bowl. If you have strays outside the bowl edges, just move them back. When you are done, save first as a pspimage to have it to use later for other projects, maybe filled with different candy. Then merge layers and save as a png to use in your scrap project.
Any questions, please email me SusieQ's Email
I try to explain these projects to my best abiblity but remember, I am not a tut writer. I will go over any part you don't understand.


2 comments:
Thank you! Your blog post will be advertised on the DigiFree Digital Scrapbooking Freebie search engine today (look for timestamp: 30 Jul [LA 12:00am, NY 02:00am, UK 07:00am, OZ 05:00pm]).
SusieQ,
you won an award check out my blog
Post a Comment